Hello everybody and welcome to today's post. Denis and I went on a date a few nights ago (see post here) and while I was doing my makeup I got inspired to write this post. I don't know about you but I love reading (or watching) date night makeup looks blog/vlog posts. I think it's because I get to see what products people use and seeing what kind of makeup products people buy really fascinates me. Plus I love to see the finished look.
So, I thought I'd join the thousands out there and share my Date Night Makeup Look. Hope you enjoy >>>>
For my face I've been using this new drugstore primer that I find to be the best primer at the drugstore at the moment. It's the *L'oreal Paris Infalliable Matte-Lock Primer and it has quickly become my face's best friend. I've been using it non-stop because it has a light and airy consistency that leaves my skin feeling baby soft and smooth. So, of course, when it was time to prime my face this was the primer I reached for.
For foundation I used my trusty *Estee Laude Double Wear foundation because it's basically a miracle in a bottle. It's long lasting, full coverage, doesn't transfer or budge, and blends like a dream. Yes, it does have a thicker consistency than most foundations but I like that because I find that it helps control oil and shine better than any other foundation on the market. It's my holy grail foundation. For a more detailed review on this foundation click here.
So after my base was laid down it was time for concealer. My favorite concealer at the moment is the *Maybelline Fit Me Concealer. In my opinion this is a drugstore product that works as well as any high end one on the market. And I cannot count the number of tubes I've gone through at this point. It leaves a light-weight finish that not only brightens the under eye but gives it an airbrushed effect.
To set everything I used *Maybelline Fit Me Loose Powder. This is another new product I found at the drugstore that I've fallen in love with. If you're looking for a really good powder that won't cake or clog your pores then this is the powder for you. I press into my skin with a damp beauty sponge and it sets everything like a dream.
After everything was set I grabbed my Benefit Hoola Bronzer and contoured my cheeks, under my chin, down the sides of my nose, and under my bottom lip. Then I used my finger tips and patted my Doll 10 HydraGel Cream Blush into the apples of my cheeks for a little color. To top everything off I added my favorite highlighter - the Wet N Wild MegaGlo Highlighting Powder. And then it was time for the eyes.
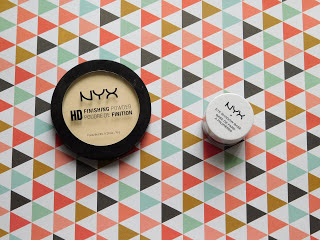
Because our date was at night I was really in the mood for a smoky eye. And what better palette to achieve a smoky eye than the *Too Faced Chocolate Bar Palette. I got this palette a few weeks ago and it has quickly become one of my favorite palettes of all time. For my full review of it click here. But before I applied any eye shadow I primed and prepped my eye lids with the following products - the NYX High Definition Finishing Banana Powder and the NYX Eye Shadow Base in Skin Tone. To be honest, I'm not a big fan of using the HD Finishing Powder on my face. It gets cakey and dries out my skin but I've found that it's perfect for setting the NYX Eye Shadow Base on my eye lids.
If you don't already, I would highly recommend investing in an eye primer. Priming your lids will take your eye shadow game to the next level. Priming your lids will do a number of things - it'll make you shadow last longer, it'll make applying the shadow a little bit easier because you'll have a smoother canvas to work with, and it'll hide any veins you have on your lids.
For my eyes I used the following products: *Too Faced Chocolate Bar Palette*Ardency Inn Modster Eyeliner, *L'oreal Lash Paradise Mascara, *Revlon ColorStay Creme Shadow in Honey, *Anastasia Beverly Hills Brow Wiz , *L'oreal Infalliable Gel Lacquer Liner in Blackest Black, *Maybelline Brow Precise Eyebrow Mascara.
I wanted to include a quick 5 Step Date Night Look tutorial of the look I did below. So if you're interested in recreating this look right here >>>>  keep on reading.
 keep on reading.
Step 1 - Take a fluffy blending brush (like the *Sigma E40) and sweep Salted Caramel into the crease and outer V. This will be your first transition color.
Step 3 - Then switching to a more tapered blending brush (like the *Morphe M433) apply Haute Chocolate and Black Forest Truffle into the outer V and slightly into the crease. This is the first of the darker shades I used. The key to a smoky eye is to start with the lighter colors and then softly apply the darker shades. If you do this you won't have to worry about having that panda bear/black eye look going on.
Step 4 - To add even more depth and darkness pack Triple Fudge with the same brush into the outer corner. I also took a flat, dome-shaped brush (the *Makeup Geek Outer V) and applied a combination of White Chocolate and Champagne Truffle to highlight my brow and inner corner.
Step 5 - For the last step I used a flat shader brush (like the *Sigma E15) and applied the darkest shades I used on my lower lash line in this order - Haute Chocolate, Black Forest Truffle, and Triple Fudge. This little trick helps to smoke out your lash line and make your eyes look wider.
I also added the L'Oreal Infallible Gel Liner and added a wing to my lid using my favorite angled liner brush - the Morphe M160 1/8. This brush is the business because it's angled and teeny tiny, perfect for drawing the perfect wing. I'd recommend any makeup beginners to get it. It'll make drawing your wing that much easier. I also added the Ardency Inn Modster liner to my water line. This liner is the best black liner I've ever used because it's the only one that doesn't fade from my waterline all day, even if my eyes start to water.
Finally, I added a few coats of the L'Oreal Lash Paradise mascara, which I'm currently loving, and that was it. Eyes were done.
Here's the finished look >>>>
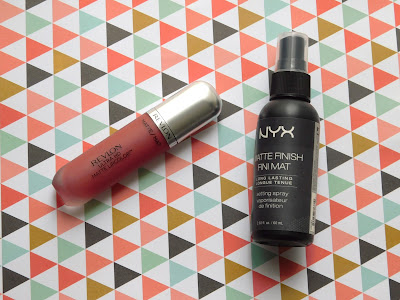
As for the lips, I reached for my *Revlon Ultra HD Matte Liquid Lipstick in Kisses and then I locked everything in place with *NYX Makeup Setting Spray in Matte Finish and headed for the truck. It was time for our date. If you're interested in a detailed review of the Revlon Ultra HD Matte Liquid Lipstick just click here.
That's all for now, folks. Until next time . . .
XOXO,
Nellie


No comments
Post a Comment